7/25/2005

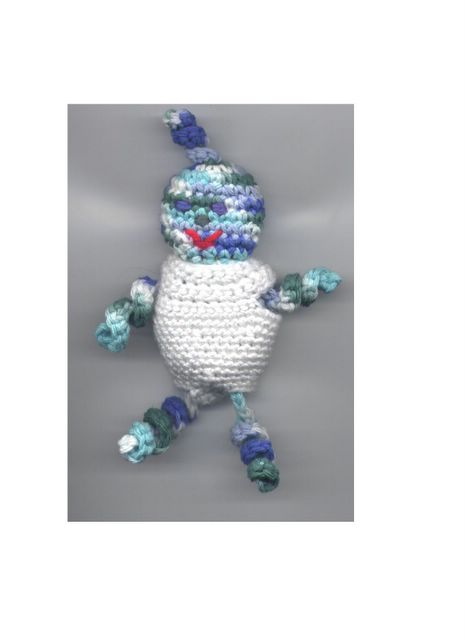
Granny's Curly Toy (Doll)


Posted by Picasa
Granny’s Curly Toy (Doll)
Worsted Weight Yarn
F Hook
Top Knot: ch 4, 2 sc in each ch
Arms: Ch 10, 2 sc in each ch
Legs: ch 15, 3 sc in each ch
Rnd 1: ch 2, 6 sc in 2nd ch from hook
Rnd 2: 2 sc inc in each st, (12 st) Rnd 3: sc in 1st st, 2 sc inc in next st, around (18 st)
Rnd 4: sc in first 2 st, 2 sc inc in next st, around (24 st)
Rnd 5-8: work 4 rounds even. At this point I tie the top knot on.
Rnd 9: sc in first ch, sc dec next 2 sts tog, continue around, (18 st) At this point I add eyes, nose and mouth if I’m going to go with simple Straight stitches and contrasting worsted yarn.
Rnd 10: sc dec 2 st tog around (12 st)
Rnd 11-12: sc in each st (12 st)
Rnd 13: 2 sc inc in each st (24 st)
Rnd 14-19: sc in each st I now tie arms on at the sides of rnd 13 and 14
Rnd 20: sc in first st, dec in next 2 st (sc 2 tog), around (15 st)
Rnd 21: even (15 st)
Tie legs at sides between rnds 20 and 21 Stuff, then crochet 2 tog (dec) rnd until 6 sts remain. End off.
Thread yarn Through st and pull tight. I have made these to put in a cradle purse using “doll colors” and used wild colors For little boys. The kids love them. If you make them for babies I recommend cotton yarn because acrylic sometimes causes a rash when baby chews on it.

RETURN TO TOP

7/15/2005

Toy Net

Toy Net Pattern: Copyright to Judith Prindle 11/29/02
Size J Hook
Worsted Weight Yarn ( amount depends on the size you want your net)
Hint: Use a good hollow wall achor with your hooks that are going to hold the net or do what we did. Use plant hooks that come with anchors.
Chain 5
Row 1; in 5th chain: double crochet, chain 1, double crochet, chain 1, double crochet...turn and chain 4...........
Row 2; in first chain 1 space: (double crochet, chain 1, double crochet)
chain 1,
in second chain 1 space:(double crochet, chain 1 double crochet)
turn and chain 4.............
Row 3; in first chain 1 space:(double crochet, chain 1, double crochet)
chain1 , double crochet in next chain 1 space,
chain 1
in next chain 1 space: (double crochet, chain 1, double crochet)
chain 4 and turn.....
Row 4;in first chain 1 space: (double crochet, chain 1, double crochet)
chain 1, double crochet, chain 1, in next 2 chain 1 spaces,
double crochet chain 1, double crochet, in last chain 1 space.
chain 4 and turn.....
Row 5; in first chain 1 space;(double crochet, chain 1, double crochet)
chain 1, double crochet in next chain 1 space...
chain 1
double crochet, chain 1, double crochet in next chain 1 space,
chain 1,
double crochet, chain 1,in next chain 1 space,
chain 1,
double crochet chain 1, double crochet, in next chain 1 space,
chain 4 and turn......
Repeat row 5, aking the increases in the middle of the increases of the previous row... Continue until your net is as big as you want it.

Round 1 of edge:
At the end of the last row turn and work 2 single crochet over the end of each double crochet row. When you reach the corner, single crochet in the point (this is the stitch you started with)
chain 8, slip stitch in the 8th chain from you hook forms hanging loop).
Slip stitch into the same stitch as your single crochet that the chain 8 was worked off of.
Work up the other side in the same manner until you reach the next point. Single crochet in the 3rd chain of this rows beginning chain 4. Chain 8, slip stitch in the 8th chain from hook. Slip stitch into same stitch as your last single croochet...
Turn...
You are back to your working edge. 1 single crochet in each chain 1 space across.
This it to prevent too much satretching of the outside edge.

Round 2 of edge; This round slip stitch in each single crochet. When you get to each hanging loop make 7 single crochet over the chain 7 loop and continue on.....slip stittch in your first slip stitch and you are done except for hiding ends.

RETURN TO TOP

5/29/2005

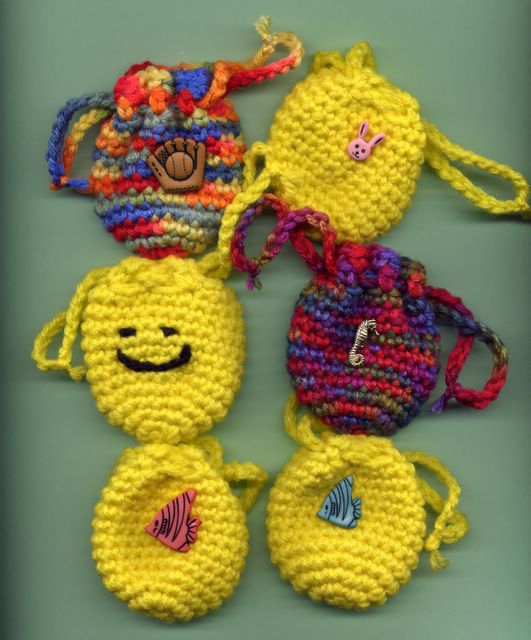
The Quarter Bag


The Quarter Bag Posted by Hello
Copyright to Judith Prindle 5/29/05
I created this cute little bag for my grandchildren to carry quarters in.
Materials:
Small amount of worsted weight yarn.
Size G crochet hook.
Black yarn to make a smiley face or a cute button, charm, or whatever you like to decorate the bag.
Finished size is about 2 & 3/4 inches wide by 2 & 3/4 inches tall.
Working in rounds without joining:
Chain 2
Round 1: 6 Single crochet in the second chain from hook. (6)
Round 2: 2 Single crochet in each stitch. (12)
Round 3: *1 Single crochet in 1 1st stitch, 2 single crochet in 2nd stitch, repeat from * around. (18)
Round 4: *1 Single crochet in 1st 2 stitches, 2 single crochet in next stitch, repeat from * around. ( 24 )
Rounds 5 - 12: Single crochet in each stitch around, slip stitch in next stitch to join, chain 1.
Round 13 : Single crochet in same stitch as chain 1, * chain 2, single crochet in next stitch, repeat from * ending chain 2, join with slip stitch in first single crochet.
Pull ties(make 2):
Chain 30, end.
Thread the first tie through all the way around, and join it to itself.
Thread second tie through starting on the opposite side of the bag that you began to thread the first tie through. Join this to to itself also. When the ties pulled on each side, at the same time the bag closes.

RETURN TO TOP

5/16/2005

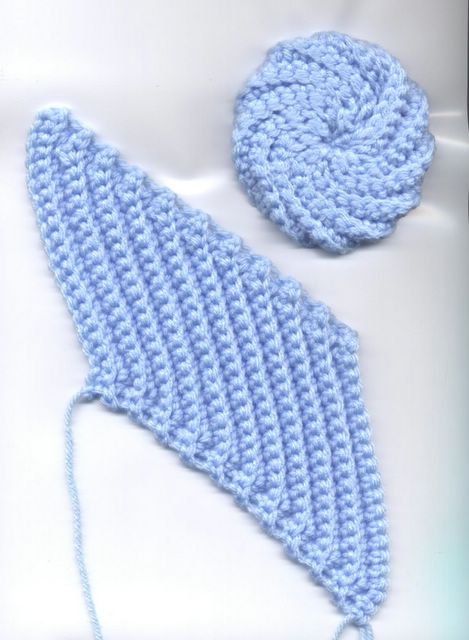
Spiral Scrubbie


Spiral Scrubbie Posted by Hello
Translation By Judith Prindle 3/05
Based on the translation of the Knitted
Japanese Tawahsi found here;(PDF file)

My crochet version is 20 stitches by 21 rows.
I used:
size H crochet hook
worsted weight acrylic yarn (doesn't take much)
Gauge: didn't check but my finished scrubbie is
about 3 & 1/2 across if you squish it flat!
Crochet in the back loop through out to create the ridge.
Row 1:
(leaving a length of yarn long enough to weave
through & gather one edge and tie off.)
chain 21: 2 single crochet in second chain from hook,
crochet one single crochet in each chain across
to last 2 chains; crochet the last 2 chains together
chain 1 and turn (20 stitches)
Row 2:
single crochet first 2 stitches together,
crochet one single crochet in each stitch across to last stitch, 2 single crochet in last stitch
chain 1 and turn (20 stitches)
Row 3:
2 single crochet in first stitch,
crochet one single crochet in each stitch across to last 2 stitches, single crochet last 2 stitches together chain1 and turn (20 stitches).
Repeat rows 2 &3 for a total of 21 rows.
Cut yarn leaving this second end long enough to weave through & gather one edge then tie off.
Slip stitch beginning row and ending row together.
Using the end of yarn weave each end in and out of the ends of the rows of the edge it is attached to. Pull them tight.
Now pull one yarn end through the scrubbie and tie in a tight knot.
Pull both ends back through to the other side and knot again.
I simply pull the end to the inside of the scrubbie and back out, making sure to leave a length of
tail on the inside I cut.
I don't try to weave the ends through the stitches themselves.
I have been using some of my scrubbies since February and no ends have popped out yet.
On my earliest scrubbies I left the yarn tails long enough to crochet a chain to hang them with.
I find I don't use the hanger so I don't do that
any more, but you could!

RETURN TO TOP

4/09/2005

Tiny Little Crocheted Bag


Posted by Hello
Created by Judith Prindle 4/5/05
G hookSoft Baby Yarn
Not Important, but I got....Gauge: 10 rows & 8 stiches = 2 inches...almostChain 9
Row 1; Single crochet in second chain from hook and next 7 chains. (8 stitches)Chain1 and turn.
Rows 2-4; Single crochet in each stitch.Chain 1 and turn.
Row 5; Single Crochet in back loops of each stitch.Chain1 and turn.Working in both loops again;
Rows 6-20; Single crochet in each stitch.Chain 1 and turn.
Row 21; Working in back loops:Single crochet first 2 stitches together,single crochet in next 6 stitches,single crochet last 2 stitches together.
(6 stitches)Chain 1 and turn.Working in both loops again;
Rows 22-24; Single crochet in each stitch.Chain 1 and turn.
Row 25;Slip stitch in each stitch end. The construction of this bag is like a sandwich baggie.This might help you "see" how it goes together...Fold the bag with the first flap to the inside, along the edge of row 5.( this will be the outside of the bag when you are done)Sew the bag together catching all 3 layers at the top.Weave in ends and you are done. This bag couldbe made any size you want............................................................................
For the tea bag in the picture........Begin with 12 stitches. Make the flaps with the same amout of rows, and decrease the same as for the smaller bag, but work 28 rows for the body of the bag. For the tag I chained 6 so I would be crocheting 5 stitches for 3 rows. I thensingle crocheted around the edge. Make 2 of these.After "writing" tea on the front I slipped stitched the 2 pieces together.End off................

RETURN TO TOP